Setting up a sub domain staging area on your server is an easy way to test Magento upgrades or theme updates. A cheap solution for small businesses unable to support dedicated test servers, it also means you have the same server environment and don’t need to worry about the issue of moving large database and files across servers.
It is definitely preferable to performing changes directly on your live site, although it will put more pressure on the live server.
Staging Sub Domain
Sub domains allow you to have a new web address for separate areas of your website, for example you could have staging.yourwebsite.com and point this at your yourwebsite.com/staging/ directory.
By copying your database and files, staging.yourwebsite.com will become a duplicate of your main Magento site, allowing customers to continue to use your main website’s admin and frontend, whilst you test potential update issues.
1# Create A Sub Domain
Add a new A type DNS Entry
Log into your domain registrar (e.g. 1and1, GoDaddy, 123-reg) and add a new DNS entry to your main domain.
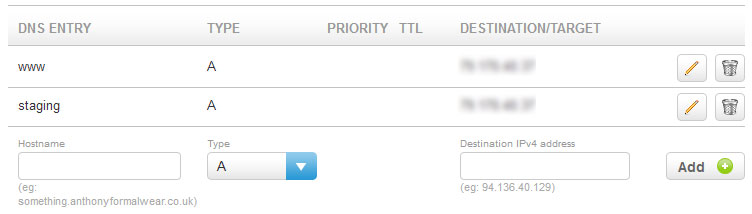
Create a new entry with;
DNS Entry – staging
Type – A
Destination – Your IPv4 address e.g. 11.111.11.11.
Your IPv4 address information may already be listed under another DNS entry, or within your hosting information.
This information can take 12-24hrs to propagate, so it’s best to set this up first.
Point your Sub Domain to a Folder
Log into your hosting control panel and find the sub domain section.
Create a new sub domain entry with;
Domain name
staging.yourwebsite.com
Directory
/home/sites/yourwebsite.com/public_html/staging/
Your directory path is specific to your hosting set up.
2# Create A Staging Database and User
Create a blank MySQL Database
Within your hosting control panel, find the MySQL Database section.
Create a new username (staging) and password (generate a secure password). Create the database and make a note of the database name and your login details. My host added a prefix to the database name, so watch out for this. If prompted your user should have all privileges.
3# Copy your Production Store Database
Your production store database will contain your order, category and product information, so you’ll need to copy that across.
You can do this by exporting the database of your store using PHPMyAdmin or SSH. I’d advise running a maintenance script to empty/truncate your log and report tables beforehand to get your db size down. You can then zip compress this file and import it to your empty staging database.
Copying your Production Store Database via SSH
You’ll need the login info for you production db user.
mysqldump -u PRODUCTION_DBUSER -p PRODUCTION_DBNAME > data.sqlImport your Database via SSH
You’ll now need the login info for your staging db user.
mysql -u STAGING_DBUSER -p STAGING_DBNAME < data.sql
4# Copy your Production Store Files
Update Magento
If you wish to update your version of Magento, I’d do this now instead of bringing all your Magento files across. Download the latest version of Magento and upload the .zip file to /staging. Then uncompress the files to the root of /staging.
You’ll still need to edit your local.xml file to link to your staging database (see below).
Copy / merge your files across
To replicate your production site you’ll need any theme, plugin and media folders and files in;
- app/code/community
- app/code/local
- app/design/adminhtml/default/<your theme>
- app/design/frontend/base/default/layout
- app/design/frontend/base/default/template
- app/design/frontend/default/default/layout
- app/design/frontend/default/default/template
- app/design/frontend/<your package>
or - app/design/frontend/default/<your theme>
- app/etc/modules
- app/locale
- js
- lib
- media
- skin/adminhtml/default/default
- skin/frontend/base/default/<your theme>
- skin/frontend/<your package>
The most important of these is your media folder for all your product images. If you’re planning on adding a new theme you can leave much of the custom files behind.
5# Update your Config
local.xml
You’ll need to copy app/etc/local.xml over from your production db, modifying the database name and login. This file also contains your original encryption key and install information.
Unsecure and Secure URL
Next we’ll change the URL for your staging store via phpMyAdmin, as we don’t yet have access to the admin area.
Login to phpMyAdmin, select your staging database and run the following SQL query to find those URL entries;
SELECT * FROM `core_config_data` WHERE `path` LIKE '%base_url%';Click on the pencil icon to edit the paths and change them to your staging values, making sure to keep the trailing /.
6# Site Set up
Add a Tmp folder
Create a tmp folder within var/tmp and in the root.
Display Errors
Change errors/local.xml.sample to local.xml.
This is a temporary change to help you to quickly identify errors via the browser. Once the staging store is fully up and running you can revert this back and use system.log and exception.log error reporting.
.htaccess
Check that your .htaccess file doesn’t have any domain specific redirects. Such as pointing your main domain to a www. address.
Change file permissions and delete cache
Your .htaccess file permissions will need to be changed to 777 and the following folders should be emptied;
- /var/cache
- /var/locks
- /var/session
- /var/tmp
Or
Run a magento-cleanup file to correctly set your folder permissions and to delete any old cache files.
Delete your browser cache and cookies.
You should now be able to access your staging store’s admin. This will allow you to double check your URL set up and to empty cache files and to reindex.
Redirect Issues
If you have redirect issues, I’d double check that it isn’t a result of Magento or your browser’s cache. Try using a different browser and entering a fake path http://staging.yourwebsite.com/fake
to see if you get your new staging site’s 404 page.
Check that you don’t have a cache prefix set in local.xml and run through the permission and cache cleaning steps again.
Let me know in the comments if this article has helped with your Magento development issues.


Yes we too faced a few issues initially but as usual we bounced back. Well you have done a good job so far. Keep it up Andrew.
thanks! helped a lot
I’ve done the above but not sure what to do with the Unsecure and Secure URL – are these
staging.mydomain.com/ or
mydomain.com/staging/
and i just keep getting redirected to the live site, all caches and browser cache cleared.
I’m really not that familiar with .htaccess files and am somwhat confused wtih the redirects which may be causing my isses…